A notched collar is known by this name because is made combining a lapel, and a collar, and in between both a notch is formed.
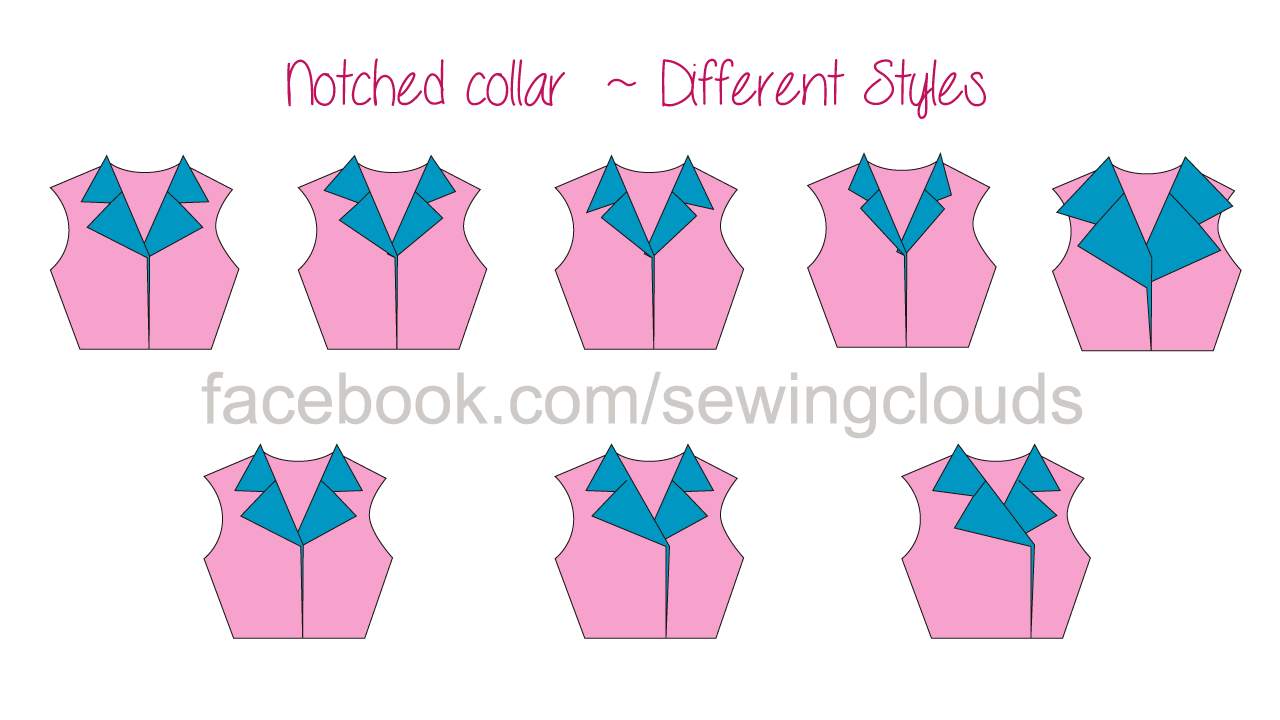
Using the same process, we can make almost any design of tailor collar, here some variations of it,notice the different widths and shapes of collars and lapels, also variations in the crossing area.
The final result of a basic one should be something like this:
Start with basic bodice patterns, if you dont have it, go to the FREE PATTERNS section of this blog and download the pattern No. 4 to find the instructions. Or use the patterns of the garment you are making, blouse, jacket, etc.
In This video, you have the complete tutorial, how to make the patterns step by step, how to cut and stitch:
click on the picture
And in case you need written instructions to trace your patterns here you have it :)
I will use the basic bodice patterns in this example, but you use the patterns of the blouse or any garment you are making.
Here: back and front
For the back patterns we will not make any change, for the front pattern proceed with the following steps:
* NUMBER 1 From the center line, add 1" (or as much as you want) for the crossing area. For buttons and buttonholes.
How much it depends on your design, see these examples for comparison :
* Mark the neckline depth, NUMBER 2 if you are not sure, measure it in your own, you can do it downwards from the base of the neck, or diagonally.
* NUMBER 3 Trace a line starting from the point 2 to the shoulder, touching the neckline curve as shown.
* NUMBER 4 extend the neckline curve in an horizontal line, as much as you want your lapel width, consider that in the garment you will fold the lapel out from the line, in this example i add 1" more and you can see in the picture above how it came out.
* NUMBER 5 from the shoulder line upwards and in the line 3 we traced before, mark the back neckline length, measure it directly in the back pattern:
And from that point, square a small line, mark half inch and trace a curve (optional) from that point to the shoulder line, touching the line 3.
* NUMBER 6 from the center point of the pattern (where the original neckline ends) trace an angle line, any angle you want, as open as you want, here you are drawing the shape of the notch.
* NUMBER 7 in the line 6mark any bottom length you want for your collar, in this example i used 2.5"
* NUMBER 8 extend to the right the small line we made in the point number 5
* NUMBER 9 in the line 8 mark the top width you want for your collar, again, is up to you but here in my example i marked 3.5"
For reference in these points see the next picture:
*******************************************
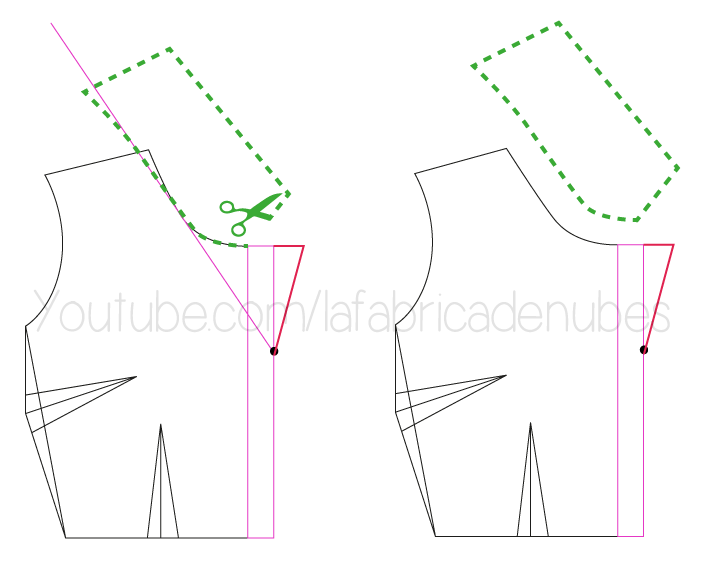
* Trace the contour of the collar, cut it and keep it apart.
* Match the shoulders of your patterns and correct it make it them equal.
* Trace the back and front facing pieces as shown, transferring the shape of the patterns and keeping 2" width for both
These are the patterns for your notch collar, when cutting the fabric pieces:
* BACK: 1 piece in folded fabric
* FRONT: 2 pieces
* UPPER-COLLAR: 1 piece in folded fabric
* UNDER-COLLAR: 2 pieces (cut on bias)
* BACK FACING: 1 piece in folded fabric
* FRONT FACING: 2 pieces
The instructions to stitch it, you have in the video tutorials shared above, or here you have the link:
https://www.youtube.com/watch?v=aX-Il-YDjkE
Happy stitches ! ^_^